In between class semesters, Michael’s Creative Metalworks Studio offers a number of Open Studio Sessions – *free* 6-hour long Saturday classes, where existing students feverishly finish up projects, and curious visitors get a chance to meet Michael and experience his teaching style. As a bonus, Michael’s bench-mates join him in sharing their expertise, AND you typically get fed.
I attended my first open studio session as a student earlier this March, and left it deeply impressed. Partially because I achieved a lot in the four hours I stayed. Partially because the studio was packed WAY beyond its capacity. Over 30 people showed up (as if the students that came brought their spouses, aunts and friends). All the bench spaces were taken, as well as various nooks and crannies for casting and polishing. I ended up hiding my stuff under a cabinet, and then migrating from bench to bench as they temporarily freed up while their inhabitants soldered or hammered at other stations of the studio.
I started this week’s effort by transferring the kelp design onto the back of the pendant face plate. I mirrored the design drawing by tracing it on the other side of the paper against a window, and then cut out the kelp pieces with an X-Acto knife as if preparing a stencil.

Reflection of the original design, achieved by tracing it on the other side of the paper against the window.
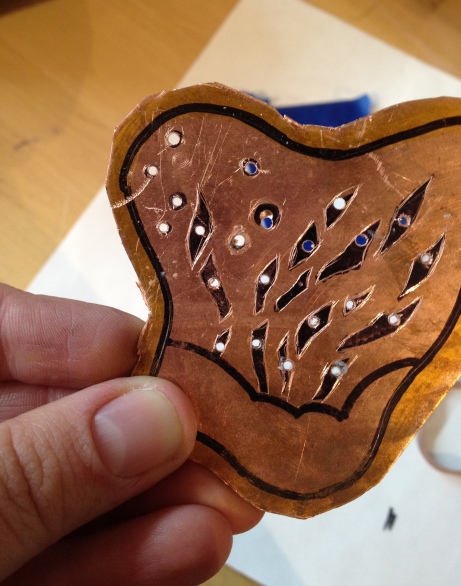
I then attached the pendant face to the drawing with artist’s tape, filled in the cut out areas with permanent marker, and re-sketched their outline on the metal with a scribe for additional accuracy.
Next, I got introduced to the flex shaft – both fun and intimidating. I took some time figuring out how to change the attachments and work the pedal to maintain an even speed, but eventually set myself up with a small drill bit and a lot of wax. I hammered a chisel into each kelp shape a couple of times to create indents; these would serve as starting points for the drill, minimizing slippage. As you can see from the photo below, I still ended up scratching the piece in a couple of spots. My main take-aways: 1) wax the drill bit often and consistently to keep it lubricated and to prevent it from overheating; 2) keep the metal piece over the soft wood of the bench pin and don’t be afraid to apply pressure to the drill. This will let you drill the holes quickly, increasing the stability of your hand and avoiding warping of the metal.
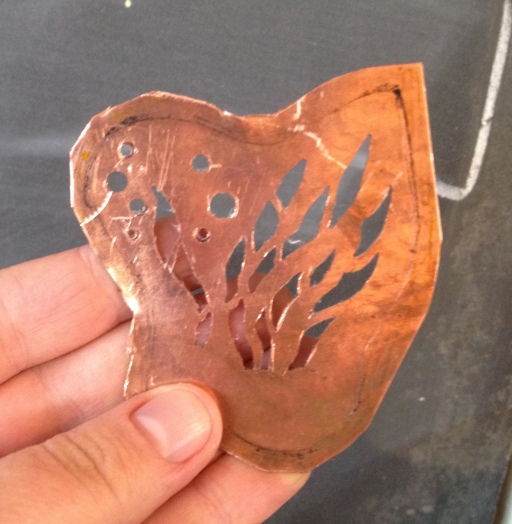
Next, I pierced out all the kelp shapes using a jewelers saw. Guys! – piercing is my new favorite thing *dreamy sigh*. I will admit that with a design like this one, containing numerous small shapes, it can get tedious to thread the saw blade into the drilled hole, reattach the blade and reset the saw tension, saw out the shape, then loosen the blade, and repeat, and repeat. I’m also not so hot on the amount of metal dust that ends up everywhere – from the pin, to my fingers, to the apron – everywhere.
But aside from that – what bliss! Wax the blade and relax into the groove – keeping the saw vertical with a light hold, using a large motion that maximizes the full length of the blade, simultaneously turning the metal to guide the direction of cutting… I found I got the best results when I kept a meditative rhythm. At a persistent but unhurried pace I was able to avoid catching the blade or letting the curve of a line get away from me. Turning the blade around in corners turned out to be the hardest to learn – I sort of had to cut a little circle by slowly pivoting the metal while continuing to saw, and then the blade could change directions drastically without twisting.
After piercing the kelp pieces, I needed to fill out their shape by filing out the irregularities. Michael gave me the option of using the flex shaft or needle files, and I chose the latter as I thought it would provide greater control. And guess what? I’m the filing queen! (Muahahaha! At least for a beginner. Heh. Michael sounded impressed with the result, so I felt really pleased). I ended up favoriting four of the smallest files: a slitting file to create edges; a barrette file to smooth concave lines; a crossing file to enlarge convex lines; and a round riffler file for circles.
My next steps for this pendant will once again be exciting learning experiences:
- soldering the side lining to the face plate;
- cutting off the overhanging face plate edge and filing it into a seamless connection;
- bravely fitting the bezels to the stone and to each other;
- soldering the step with the bezel;
- filing off the excess from the bezel to get the finished shape;


I knew you’d love piercing and sawing out the shapes! That was one of my favorite things to do too. The pendant is coming along nicely, can’t wait to see the finished product.
LikeLike
Yes! Piercing was awesome 😀 I’m trying to come with some smaller designs to pierce on my own – that would balance practicing, and conserving metal. 🙂
LikeLike
I am so jealous you have a place to take classes like this. The local art guild used to have classes in metalwork, and I took an enameling class 5 years ago or so and LOVED it. But sadly now they only do drawing and painting classes. I’ve played around with a little metal work but I really want to learn these skills you are learning. It looks so fun!
LikeLike
Hey Amy!
When I was looking for classes to take, I first actually browsed offerings by local universities and colleges. We live between DC and Baltimore in MD, so there are a ton of educational institutions in the area – but perhaps even less populated areas tend to have a college or two? (I don’t know where you live).
But anyways, while taking courses at universities is often an expensive investment “just for fun”, I find that colleges tend to offer a good variety of art courses.. AND are very cool with adults signing up for credit courses (I mean, I had to pretend-declare a major, and sometimes you need to talk to the department head to convince them that you have the basic skills necessary for a course – but mostly the process felt very accommodating).
Now that you point it out, though, I feel very grateful that I have these opportunities ready available. 🙂
LikeLike
Yeah there are probably more opportunities in the Chicago area, but I wasn’t ready to seek them out yet when I lived up there. Now I’m in central Illinois, and we have a couple smaller colleges in the area. I should look into the state universities, I’d so far only looked at our community college, but they don’t do anything more advanced than peyote stitch or loom weaving.
There is something about sawing and hammering metal that makes me happy. So I’ve been itching to try soldering and learning to nicely finish a piece.
LikeLike
Do you have an ok time learning from books or video tutorials?
I actually got a bunch of books on jewelry fabrication and soldering, but still felt uncomfortable trying at home/setting up a studio before taking a couple of classes from Michael (good thing too, as my first attempts were disastrous and discouraging).
But if you’re good with trying things out on your own, I could send some book recommendations your way, and forward you any useful tutorials I come across!
LikeLike
I have bought a book and watched some tutorials, but I haven’t been brave enough to try on my own. I either need to just packed away all my worries of wasting material and failing at creating what I want and just try or find a class. Not this summer but maybe next summer I was thinking of going back to the Bead and Button show in Milwaukee. Have you heard of it? Or been? I’ve gone in the past and even took a couple classes one year. Classes are pricey but I got what I needed out of it.
LikeLike